Introduction
Distal radius fractures are among the most common orthopedic injuries.1 Their primary treatment method shifted from percutaneous fixation in 1999 to open reduction and internal fixation (ORIF) by 2007 with the introduction of locking plates and screws uniquely designed to match distal radius topography.2 The further development of various new plating systems has allowed improved radiographic alignment and earlier mobilization.3 Still, reports of tendinous and neurovascular complications are non-negligible.4 It is, therefore, important for surgeons to understand wrist anatomy and exposure techniques to avoid iatrogenic injuries. Detailed anatomical images likewise support patient understanding of medical procedures. This article reviews the pertinent anatomy and presents an illustration series (created by the first author, M.W.) depicting the open volar and dorsal approaches to safe and adequate exposure of the distal radius.
Superficial Anatomy
A delicate bed of neurovascular structures lies within the subcutaneous tissue of the wrist joint. The radial sensory nerve travels in a plane between the pronator teres and brachioradialis (BR) before emerging below the BR tendon 8–9 cm proximal to the radial styloid.5 It then runs over the snuffbox and divides into terminal branches, which provide sensation to the radial wrist and dorsum of the lateral 3.5 fingers. The dorsal cutaneous branch of the ulnar nerve originates from the medial aspect of the ulnar nerve 3–6.4 cm proximal to the ulnar styloid process.5,6 It then courses below the flexor carpi ulnaris (FCU) tendon and over the ulnar head. At the ulnar styloid process level, it divides into branches that provide sensation to the dorsal ulnar wrist and dorsum of the medial 1.5 fingers. The lateral and posterior antebrachial cutaneous nerves additionally contribute sensory innervation to the dorsal hand. Finally, the palmar cutaneous branch of the median nerve originates from the radial aspect of the median nerve at a level ranging from 3.2–8.4 cm proximal to the wrist crease.7,8 It then travels between the palmaris longus (PL) and flexor carpi radialis (FCR) tendons before progressing superficially to provide sensation to the volar wrist and palm.
Deep Anatomy
Articular surfaces
The concave articular surfaces of the distal radius establish congruence with the scaphoid, lunate, and distal ulna, providing landmarks for managing distal radius fractures and other conditions causing distal radioulnar joint (DRUJ) instability. Three important features are the elliptical scaphoid facet, the spherical lunate facet separated from the scaphoid facet by a fibrocartilage ridge, and the sigmoid notch, which forms the radioulnar joint with the ulnar head. The radiocarpal joint affords substantial mobility that must be balanced with rotational stability via primary and secondary stabilizers of the wrist.
Primary stabilizers include the triangular fibrocartilage complex (TFCC), which holds the DRUJ in place, and the scapholunate and lunotriquetral ligaments, which hold the scaphoid, lunate, and triquetrum of the proximal carpal row together. Secondary stabilizers include the extensor carpi ulnaris (ECU) subsheath, superficial and deep heads of the pronator quadratus (PQ), the interosseous membrane of the mid-forearm, and extrinsic carpal ligaments.8 In fact, the wrist’s bony architecture accounts for only 20% of this stability, placing the burden of mechanical integrity on these soft tissue attachments.8
Volar surface
The volar surface of the distal radius provides a broad area for the flexor tendons to glide over with the PQ comfortably interposed. The flexor tendons of the superficial volar compartment include the FCR, PL, and FCU. The FCR tendon, with the radial artery following its course to the radiocarpal joint, runs radially to the PL tendon and inserts onto the second and third metacarpal bases and tuberosity of the trapezium. Deep to the FCR tendon lies the flexor pollicis longus (FPL) tendon, which travels through the carpal tunnel to insert onto the distal phalanx of the thumb. The PL tendon, interposed between the FCR and FCU tendons, forms a long palpable ridge upon flexion of the fist. It is separated from the underlying flexor digitorum superficialis (FDS), flexor digitorum profundus (FDP) tendons, and the median nerve by the transverse carpal ligament and inserts onto the palmar aponeurosis. The FCU tendon inserts onto the pisiform, the hook of the hamate, and the base of the fifth metacarpal. Underlying these flexor tendons is the PQ. Its distal margin establishes the watershed line, the most volar margin of the distal radius, and an important demarcation for proper internal fixation. Implants positioned distal to or protruding volarly past this ridge can irritate and injure the FPL and finger flexor tendons.5
Dorsal and lateral surfaces
Six extensor compartments traverse the dorsal and lateral distal radius, leaving only the radial styloid and Lister’s tubercle free of direct tendinous attachments. While the BR runs with the extensor carpi radialis longus (ECRL) and brevis (ECRB) muscles, its distance from them increases distally as it inserts approximately 17 mm proximal to the radial styloid onto the base of the first dorsal compartment tendons.5 Notably, the BR causes a deforming force that can lead to the displacement of the distal fracture fragment and hinder anatomic reduction.
The second dorsal compartment (ECRL, ECRB) is separated from the third dorsal compartment (extensor pollicis longus or EPL) by Lister’s tubercle, which functions as a pulley for the EPL tendon before it turns obliquely to insert onto the distal phalanx of the thumb. The remaining dorsal distal radius is enclosed by the fourth dorsal compartment (extensor digitorum, extensor indicis). The posterior interosseous nerve (PIN) and vessels travel deep to these extensor tendons. The fifth dorsal compartment (extensor digiti minimi or EDM) lies directly over the distal radioulnar joint, while the sixth dorsal compartment (ECU) runs over the medial aspect of the ulnar head before inserting on the base of the fifth metacarpal.
Volar Approach: Indications & Technique
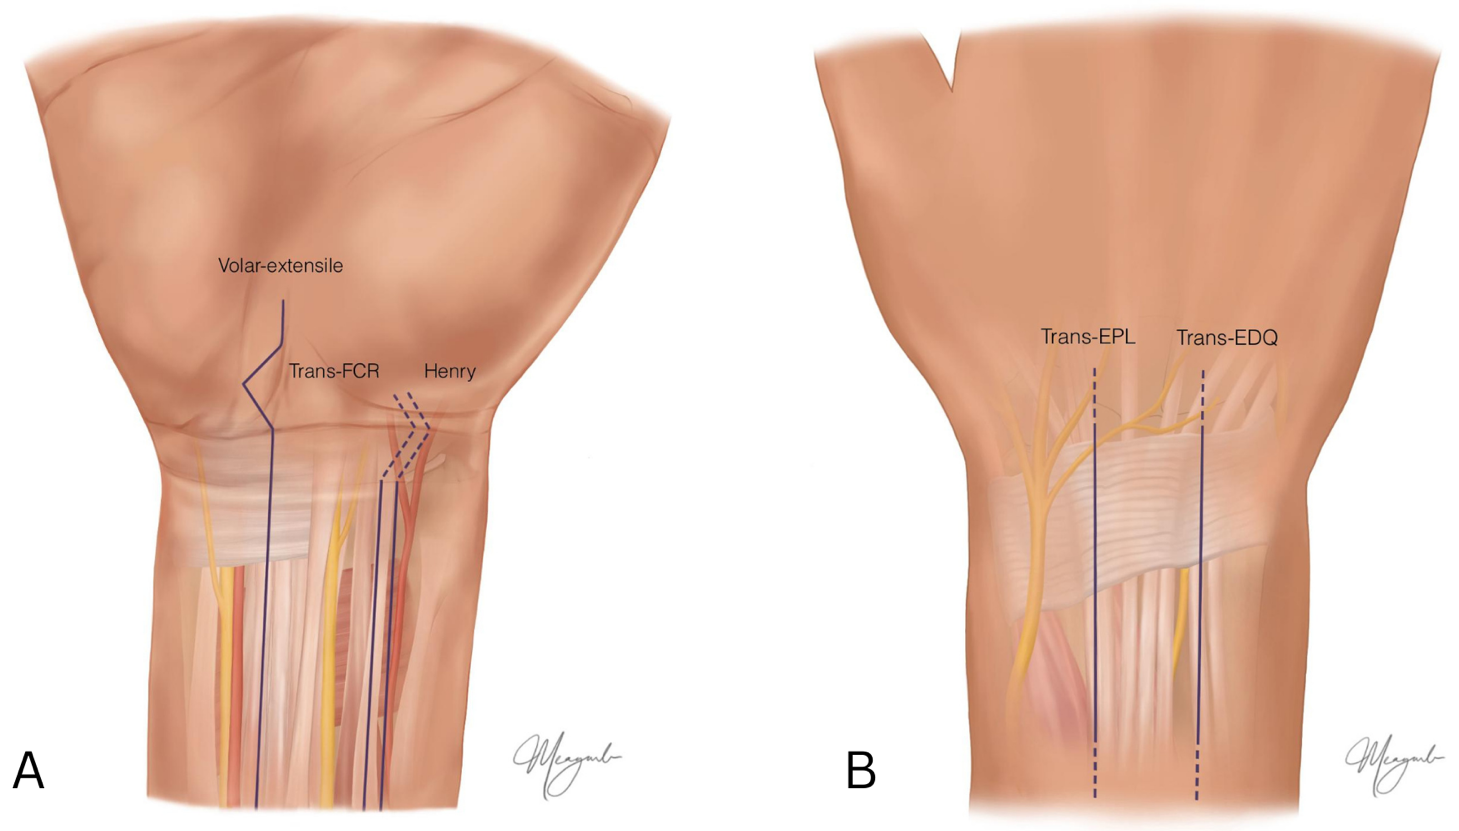
The volar approach to distal radius exposure begins with the development of one of three intervals: (1) the modified Henry approach, (2) the trans-FCR approach, or (3) the volar-extensile approach [Figure 1A]. Superficial landmarks to be palpated first include the FCR tendon and the radial and ulnar artery pulses.


Henry and trans-FCR approaches
The Henry and trans-FCR approaches are most commonly used for distal radius ORIF and differ only in the superficial interval used to expose the deep volar compartment.5 The Henry approach develops an interval between the FCR and radial artery. This allows for preservation of the FCR tendon sheath and protection of the palmar cutaneous branch of the median nerve, which arises 3–5 cm proximal to the radiocarpal joint on the ulnar aspect of the FCR, passes just radial to the PL tendon, and is at highest risk for injury.9 However, the radial artery is at risk of injury. The trans-FCR approach, alternatively, incises the FCR tendon sheath and enters through its floor to access the deep volar compartment. While it avoids dissection and retraction of the radial artery, the trans-FCR approach subjects the palmar cutaneous branch of the median nerve to potential injury. This can be prevented by avoiding the dissection ulnar to the FCR tendon.5
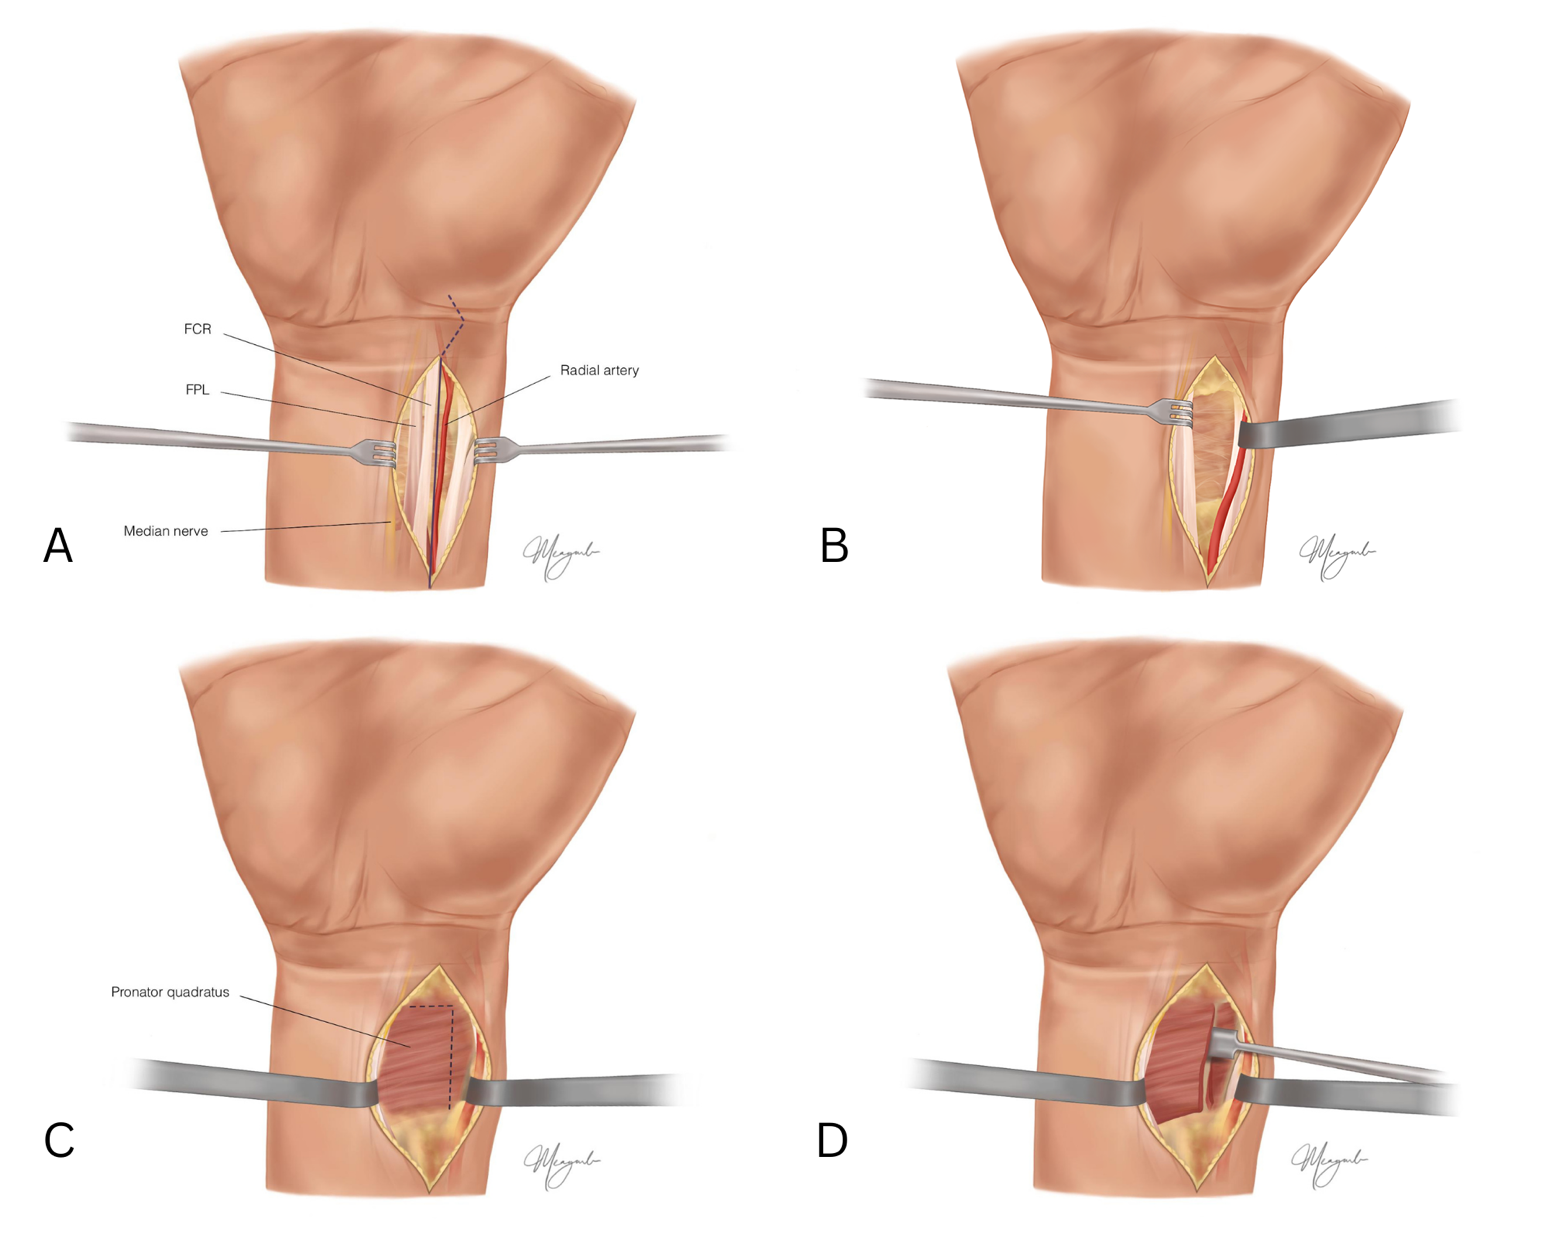
Both approaches begin with a longitudinal skin incision directly over the course of the FCR tendon sheath without crossing directly perpendicular to the flexion crease [Figure 2A]. The palmar cutaneous nerve branches are occasionally found crossing the FCR tendon sheath. The incision should measure 7–8 cm in anticipation of volar plate insertion but can be extended proximally as necessary.5
Following blunt dissection down to the FCR tendon sheath, the FCR is retracted ulnarly to expose the floor of the sheath, which is released as far distally and proximally as possible to expose the deep volar compartment. The radial artery is retracted radially to avoid injury. All digital flexor tendons (FPL, FDS, and FDP) are retracted ulnarly [Figure 2B]. With the FPL retracted ulnarly, the PQ muscle is fully exposed [Figure 2C] and can be sharply elevated along its radial border and reflected ulnarly [Figure 2D]. A small PQ insertion cuff on the distal and radial aspect of the radius is left attached should the muscle be repaired upon closure.
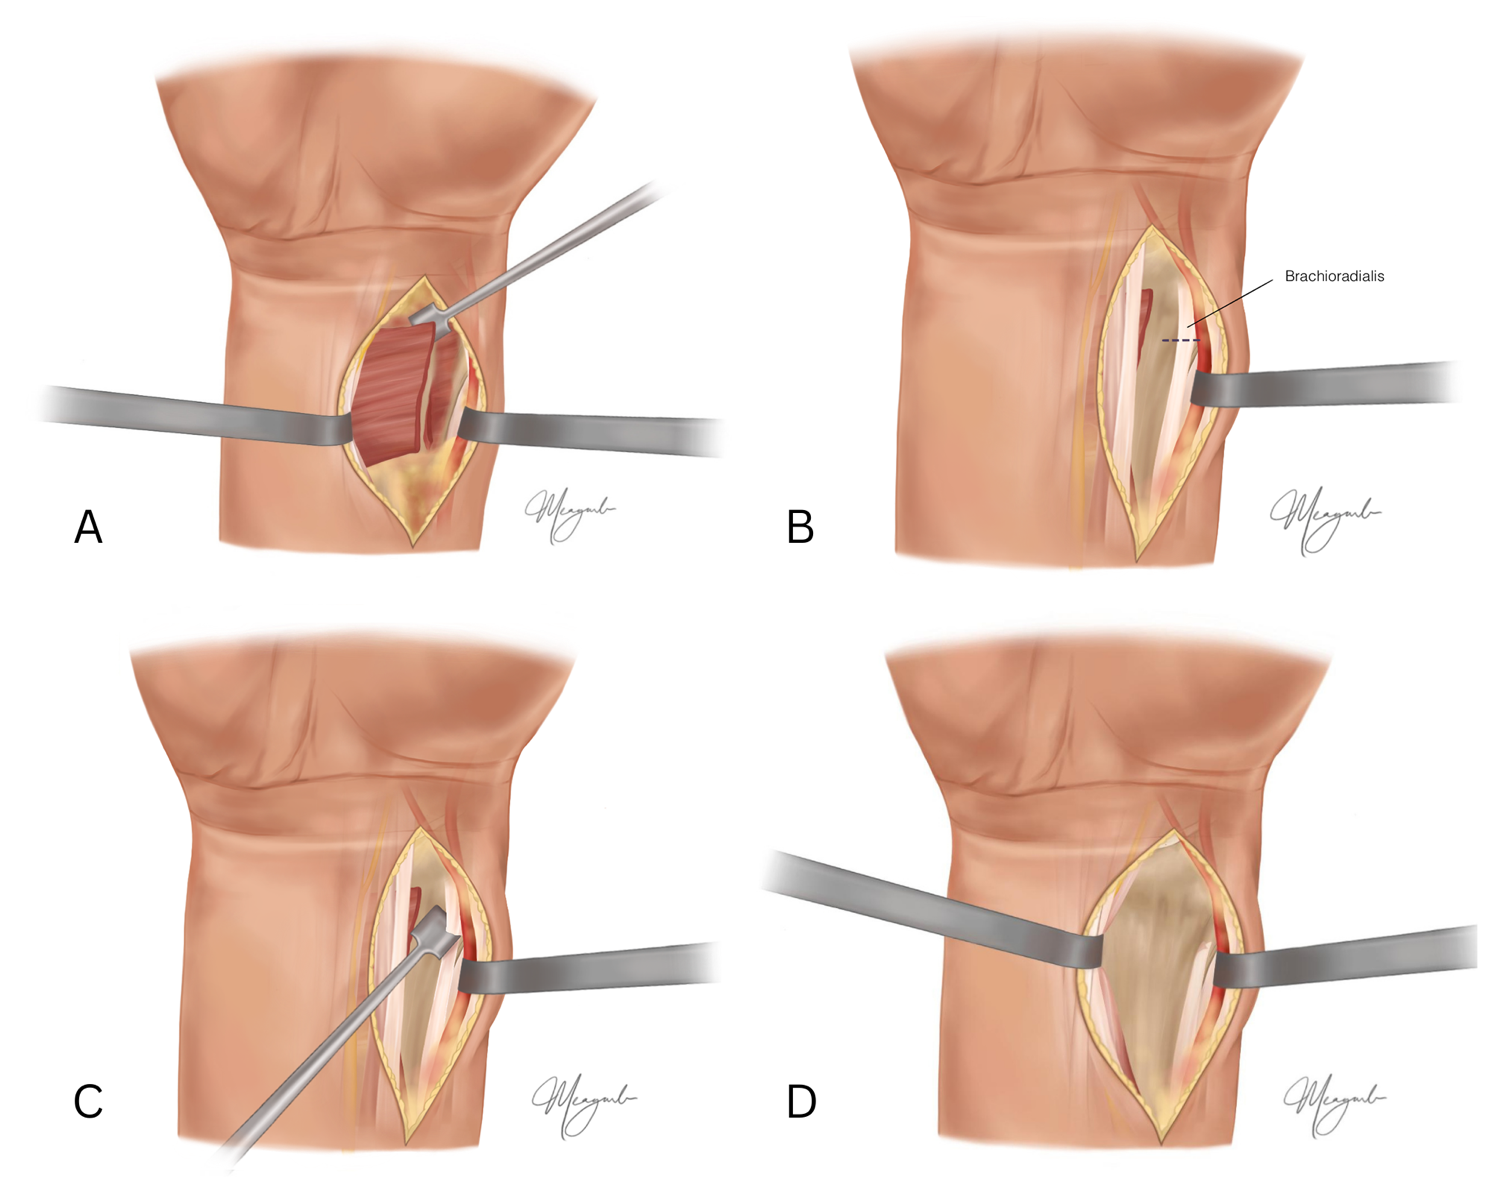
Following the distal release of the pronator quadratus [Figure 3A], both the radial artery and branch of the radial sensory nerve are retracted radially [Figure 3B]. Tendons of the first dorsal compartment lying superficial to the BR tendon are retracted radially to expose the BR for its release off the radial styloid [Figure 3C], which aids in fracture mobilization and removes the deforming force. The fracture site is fully exposed, and alignment can be assessed via fluoroscopy [Figure 3D].
__the_radial_sensory_nerve_and_radia.png)
It is important to note that the trans-FCR approach should be expanded to the extensile FCR approach to reduce fractures involving severe intra-articular displacement or fracture hematomas.10 While the extensile FCR approach begins with the development of the same interval as the trans-FCR approach, key differences include the release of the radial septum, the subperiosteal release of the proximal radial fragment, and pronation of this proximal fragment to allow for ample exposure of the fracture surfaces, bone grafting, and callus removal as necessary.10 Essentially, the metaphyseal fragment is opened up to access the joint surface from within the fracture space.
Volar-extensile approach
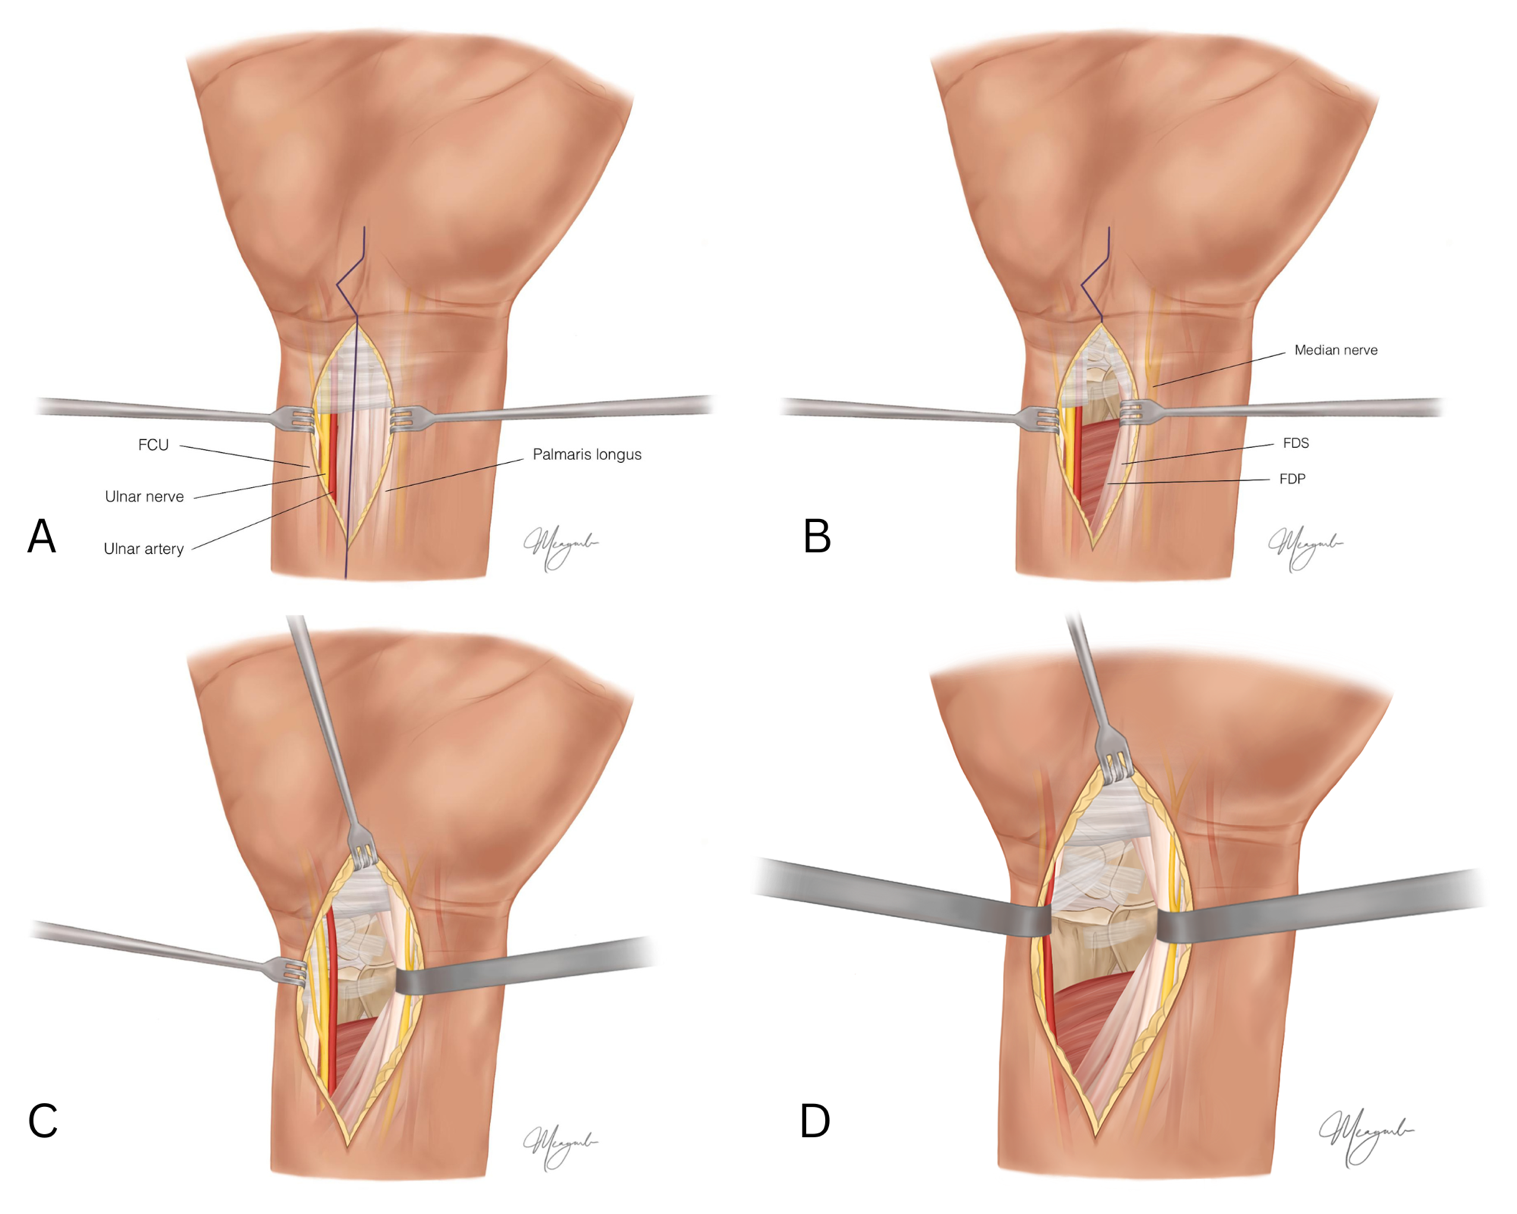
The volar-extensile approach, intended to incorporate a carpal tunnel release, offers maximum visualization of the distal radioulnar and radiocarpal joints with minimal risk to underlying structures. The volar-extensile approach begins with a longitudinal skin incision starting proximally between the FCU and PL tendons and ending at the distal volar wrist crease [Figure 4A].5,9 The fascia between the FCU and PL is then released.

Deep dissection involves the development of an interval between the ulnar neurovascular bundle immediately lateral to the FCU and the contents of the carpal tunnel radially.5,9 The ulnar artery and nerve are allowed to course unmanipulated towards Guyon’s canal. In contrast, the FDS, FDP, and median nerve are radially retracted to expose the distal radius [Figure 4B]. The digital flexor tendons thus provide a soft tissue buffer to avoid pressure on the median nerve.9 The incision can be extended obliquely across the wrist to incorporate a carpal tunnel release in an acute setting or, more controversially, in a prophylactic setting [Figure 4C]. In this case, the ulnar artery and nerve are retracted ulnarly [Figure 4D].
Dorsal Approach: Indications & Technique
Different intervals can be chosen between extensor compartments to access the dorsal surface of the distal radius [Figure 1B], with the most common involving dissection of the third dorsal compartment with the elevation of the radial aspect of the fourth extensor compartment to access the intermediate column. It is important to be aware of specific challenges to dorsal approaches for exposure and fixation. The space between skin and underlying osseous surfaces is less than in the volar compartment and is maximally occupied by extensor tendon sheaths. These factors, along with the convexity of the dorsal surface of the distal radius and altered anatomy in the setting of a displaced fracture, increase the likelihood of injury from abrasion of the extensor tendons against implants.9
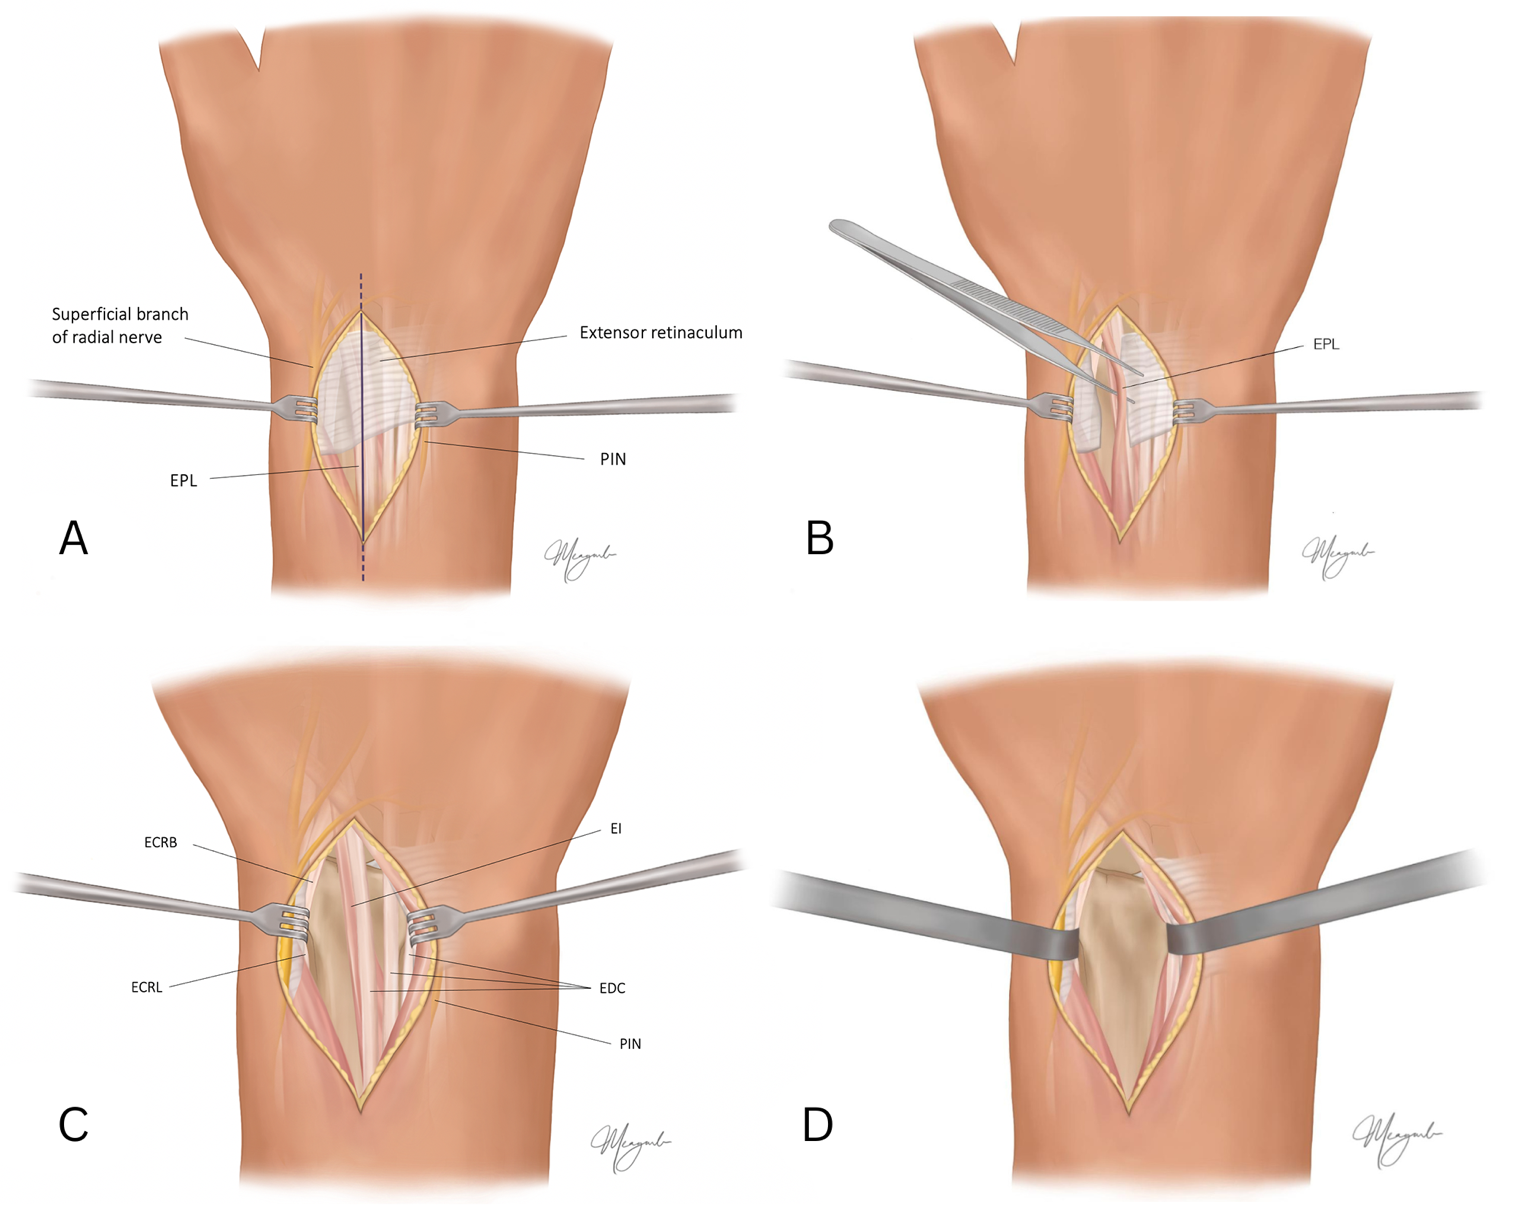
Trans-EPL approach
The trans-EPL approach begins with a 7–8 cm longitudinal incision just ulnar to Lister’s tubercle in line with the EPL tendon running in the extensor retinaculum [Figure 5A]. On its path towards the distal phalanx of the thumb, the EPL tendon exits the extensor retinaculum just distal to Lister’s tubercle. Dissection is carried down to the extensor retinaculum, and a full-thickness skin flap is raised, essentially retracting branches of the radial sensory and dorsal ulnar sensory nerves as well as any dorsal veins with it.5 A full-thickness incision is made across the extensor retinaculum through the roof of the third extensor compartment to free the EPL tendon [Figure 5B], which is then retracted radially [Figure 5C]. The dorsum of the distal radius is subsequently exposed via subperiosteal dissection of the second and fourth extensor compartments, which are elevated in opposite directions [Figure 5D]. The PIN should be identified on the radial aspect of the fourth compartment floor. Either neurectomy to achieve denervation of the dorsal capsule9 or nerve transposition above the implanted hardware to avoid impingement is performed.5

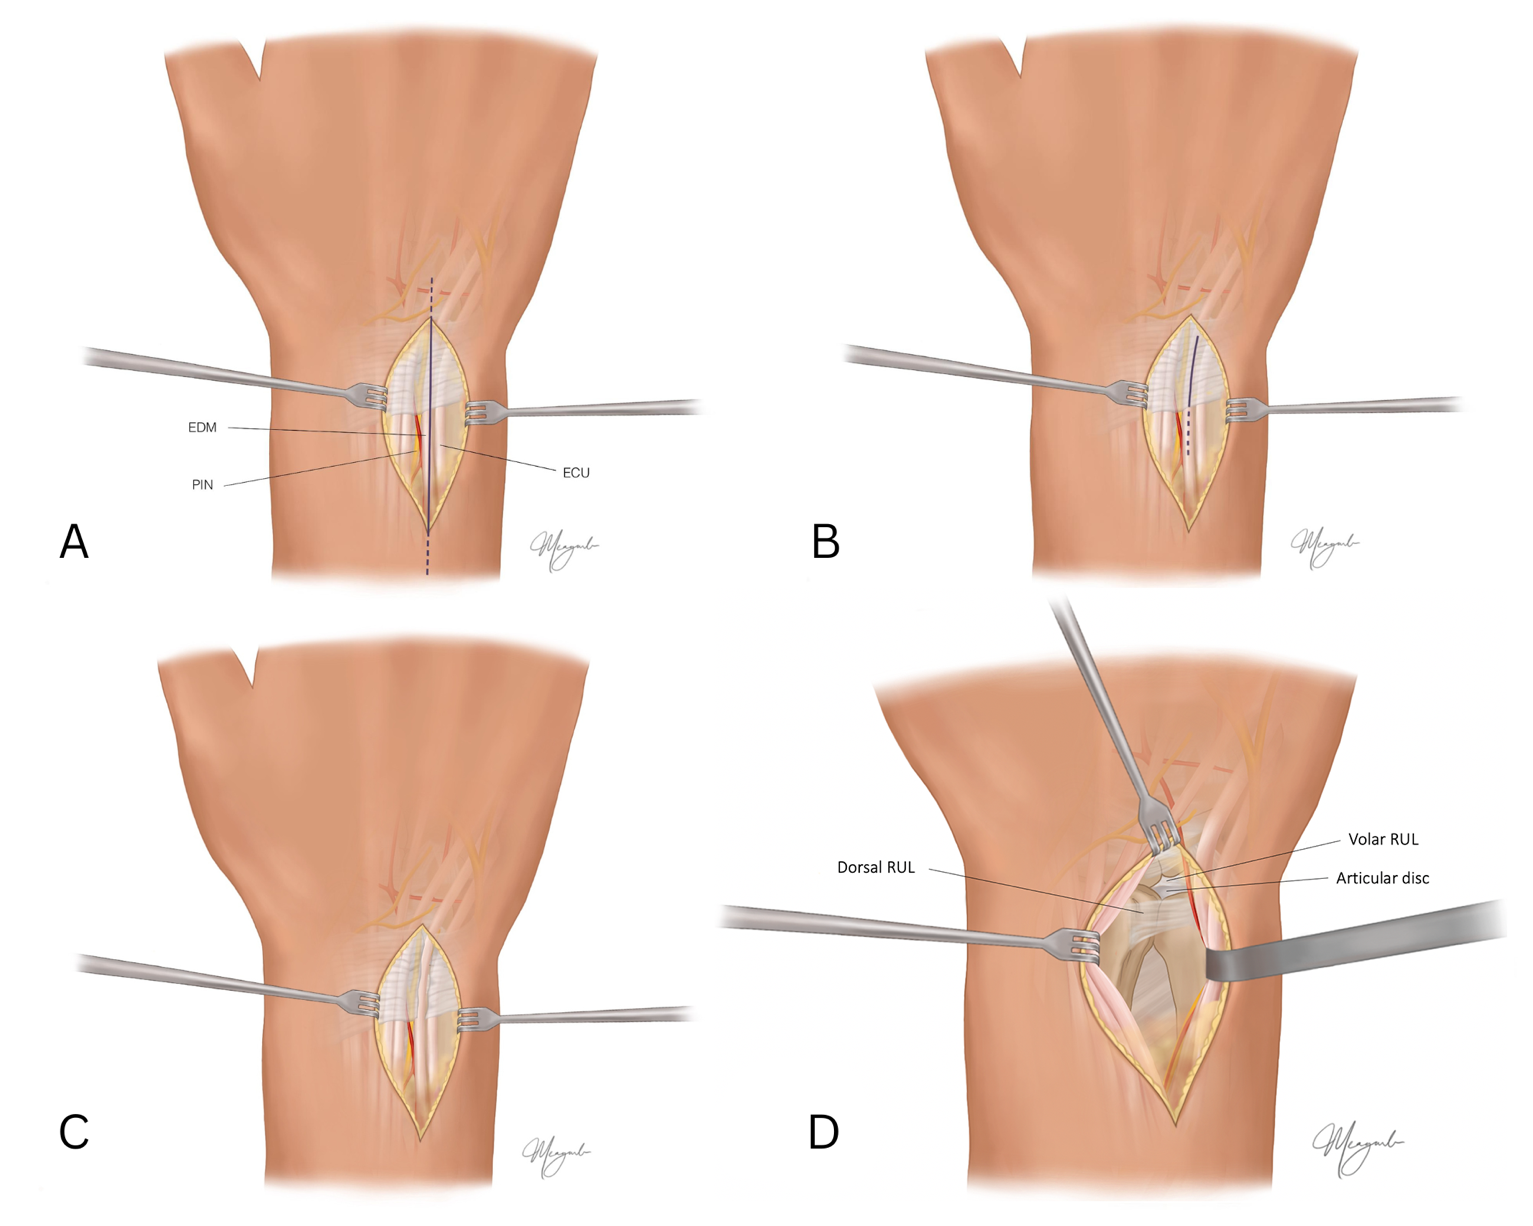
Trans-EDQ approach
The trans-EDQ approach allows direct visualization of the distal radius at its dorsal ulnar corner. This begins with a longitudinal incision over the DRUJ just medial to the styloid process of the ulna [Figure 6A]. Dissection is again carried down to the extensor retinaculum [Figure 6B], which is incised to expose the extensor tendons distally [Figure 6C]. The EDM is retracted ulnarly, and the EDC tendons radially to reveal the DRUJ [Figure 6D]. Care must be taken to preserve the ligamentous components of the DRUJ crucial to its stability.

Discussion
This surgical exposures article, made accessible to surgeons and patients alike, presents a detailed visual representation of the major open volar and dorsal approaches to distal radius exposure. It is important to note that other less commonly used approaches exist, including the radial approach to access the dorsal lateral aspect and the arthroscopic approach to better visualize the articular surface.5 Overall, a thorough understanding of regional wrist anatomy is necessary for safe and adequate exposure of the distal radius and successful surgical management of this common fracture.
Declaration of conflict of interest
The authors do NOT have any potential conflicts of interest for this manuscript.
Declaration of funding
The authors received NO financial support for the preparation, research, authorship, and publication of this manuscript.
Declaration of ethical approval for study
Not applicable
Declaration of informed consent
Not applicable
Acknowledgements
None